Backing up your data regularly is an important measure to protect against data loss.
A good way to do that is to configure an important folder to be automatically synchronised or mirrored.
This guide will detail how to configure automatic folder mirroring and syncing using FreeFileSync.

FreeFileSync is a free and open-source tool designed to manage file synchronisation.
It is available for downloadhere.
To install, double-poke the installer EXE after downloading it.

The first page of the installer is a licence agreement, select I accept the agreement then click Next.
The third page allows you to choose a number of components.
Its recommended that you keep all of them enabled as is the default, then click Next.

Below are instructions on how to use the different services available with this program.
The first step is to start a new configuration by pressing Control+N.
You also need to add the backup folder as the destination on the right.
Select your source and destination folders on the left and right columns, respectively.
Next, smack the Compare button to see the differences between the two folders.
You also need to configure the synchronisation variant to be Mirror.
Click compare to view the differences between source and destination, then configure the sync variant to be Mirror.
Click Synchronise to start the process.
A small popup will appear to confirm that you want to start the synchronisation now.
Click Start to continue.
When the process is complete, a confirmation window will appear, click Close to finish.
If a file is not present on one side, it will be copied across.
You configure a two-way sync almost exactly the same way as you would a mirror sync.
However, it’s crucial that you leave the synchronisation method at the default Two way.
Now it’s possible for you to click Synchronise to start the process.
A small popup will appear to confirm that you want to start the synchronisation now.
Click Start to continue.
When the process is complete, a confirmation window will appear, click Close to finish.
Filtering
If there is a file you dont want to be synchronised, you could add a filter.
This will remove the file from the list of files to be synchronised.
If you click Compare again, the file will be added to the list again.
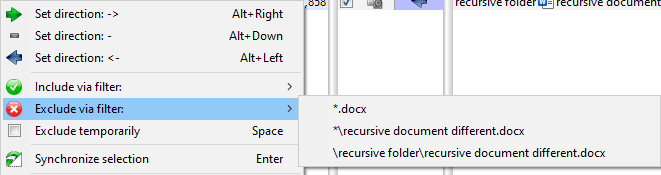
There are three filter options.
The top option allows you to filter all files with the file extension of that file.
In the case of a word document, the filter would be *.docx.
This way, no Word document will be synced.
Tip: The asterisk (*) acts as a wildcard, it means it will match anything.
So *.docx will match any filename that ends in .docx.
Similarly, the filter */example.docx will match every document called example.docx in any subdirectory.
So, if you have an example.docx in six different folders, all of them will be excluded!
Filter a file via the right-click menu.
Tip: Filters will be saved in your configuration files.
If you double-punch the save file with FreeFileSync closed, it will open and automatically import the configuration.
Alternatively, you might import a configuration file by pressing Control+O and selecting the configuration file.
Its designed to automate the synchronisation process and to run silently in the background.
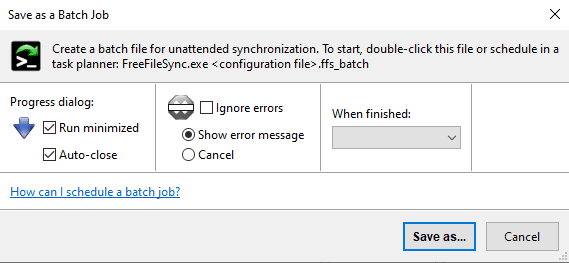
To use it though, you gotta save a FreeFileSync configuration as a Batch job.
To save a FreeFileSync configuration as a batch job, bring up the configuration file in FreeFileSync.
Leave When finished blank, the two other options will turn off the computer after running.
That can be useful for a nightly backup, but not so much for a real-time backup.
Click Save as and configure a file name to save the batch job to disk.
secure your configuration file as a batch job to run minimised.
after you grab a batch job saved, it’s possible for you to import it into RealTimeSync.
To do so, open RealTimeSync by pressing the Windows key, typing RealTimeSync then press enter.
The only setting you may want to modify is the Idle time.
If no other files change during the idle timer, then the synchronisation process will occur.
This could prevent any synchronisation from happening.
Import a batch job to automate the monitoring and synchronising process.
Press Start to launch the real-time monitoring.
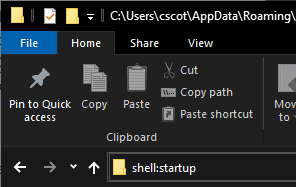
To open your start-up folder, open File Explorer and throw in shell:startup into the main bar.
Finally, move, copy, or create a shortcut to your RealTimeSync save file in the start-up folder.
bang out shell:startup into File Explorer to access your start-up folder.
The start-up folder runs any programs in it whenever you sign in.
So RealTimeSync will now launch and run in the background whenever you enter.
